The Not-So-Great PHP/MySQL Tutorial, Part 1
Posted on Wednesday, March 16, 2011
Ok, so let’s assume you’ve been given a simple task. You need to be able to record some basic data about some theoretical employees, and then produce some basic output. Let’s cover a few rules first.
The Rules
- Numero uno: Never store what you can calculate. So, if you are, say, generating an employee’s weekly pay, you do not store net pay, gross pay, or any deductive amounts. Store the employee’s pay rate and, in some fashion, the hours they worked. The method you use to store hours depends on how “normalized” you want your tables to be, and to a lesser extent how much work you want to do to aggregate the total work hours for each employee.
- Numero dos: It’s much more useful in the long run to have at least two separate pages: one for input, and one for output. Why? Because then we can isolate the logic for each I/O (input/output) path into discrete entities; in our case, separate files.
- Numero tres: Add one more file to the list: database configuration. Rather than duplicate the code to create a database connection and make some queries in every page, create one centralized config file and include a reference to it in each page.
Design the Pages
Okay, now that we’ve laid the ground rules, let’s think about how we want to assemble the pages. If we stay within the rules above, we know we have these three pages: database config, input, and output. I’m going to build this tutorial using PHP and MySQL, so my pages would be db.php, input.php, and output.php. You can name yours whatever you want (Larry, Moe, and Curly would be pretty sweet). The first page, db.php, needs to configure the database details and establish a database connection. I will show you a really simple (and not too secure) way to do this, using the MySQLi library in PHP (I’d prefer to use PDO, but it requires a bit more work to set up). I’ll show you the code for this sample, and then walk through what each part does.
db.php
<?php
    # URI: db.php
    # This file contains the database access information.
    # This file also establishes a connection to MySQL and selects the database.

    # Set the database access information as constants.
    DEFINE ('DB_USER', 'user_name');
    DEFINE ('DB_PASSWORD', 'not_very_good_password');
    DEFINE ('DB_HOST', 'localhost');
    DEFINE ('DB_NAME', 'your_awesome_db');

    if ( $dbc = mysqli_connect(DB_HOST, DB_USER, DB_PASSWORD) ) {

        if ( !mysqli_select_db( $dbc, DB_NAME ) ) {
            #    If it can't select the database.
            # Handle the error. Print a message to the user and kill the script.
            die( "<p>Could not select the database!\n<br />MySQL Error: " . mysqli_error( $dbc )."</p>" );
            exit();
        }
        else {
            # Attempt to set encoding to 'UTF-8' (for universal compatibility)
            if ( !mysqli_set_charset( $dbc, 'utf8' ) )
            {
                die( "<p>Unable to set database connection encoding\n<br />MySQL Error: " . mysqli_error( $dbc )."</p>" );
                exit();
            }
        }
    }
    else {
        # If it couldn't connect to MySQL, print a message to the user and kill the script.
        die( "<p>Could not connect to MySQL!\n<br />MySQL Error: " . mysqli_error( $dbc )."</p>" );
        exit();
    }
?>
So, I know this looks fairly arcane, and it is, to some extent. First, we define some constants. This lets us quickly change our database details in one place, should we need to. This information will normally come from your DBA (database administrator), or assuming you’re running the whole show, will be the database details you set up in phpMyAdmin. That is beyond the scope of this tutorial, though, so hopefully you know those details or can acquire them.
Next, we attempt to establish a connection to the database server, using the user information we defined previously. If we’re able to establish a connection, we attempt to select our database. If our script hasn’t faulted yet, we then attempt to set a character set. That part is optional, but it helps to ensure that we are providing content that can be displayed in as many languages as possible.
Each time you see the keyword die, you are looking at a PHP method that tells the PHP compiler to display our error message, should an error occur, rather than the default message. On simple sites, I display a simple error message to the user and email a much more detailed message to whatever email is appointed the “support” email role. The method exit tells the compiler to stop running this script because we are in a state where nothing after this point will function correctly. If we get past all of those exit methods, we have a working connection to the database, which we will use in each page.
input.php
This is where we gather data on our employees, and also where we have to know how our tables are built. For the sake of simplicity, we will use a non-normalized table that holds everything. This is the table structure:
Employee
==================================
int             id         not null     Primary Key
varchar(35)     first        not null
varchar(65)     last        not null
decimal(6,2)     rate        not null
decimal(4,2)     monday    not null    default 0
decimal(4,2)     tuesday    not null    default 0
decimal(4,2)     wednesday    not null    default 0
decimal(4,2)     thursday    not null    default 0
decimal(4,2)     friday    not null    default 0
Our page to gather these values will be somewhat simple:
<!DOCTYPE html>
<html lang="en">
<head>
<meta charset="utf-8" />
<title>Dah Payrolla</title>
<style>
body { font: 14px/22px Calibri, "Frutiger Linotype", Frutiger, "Gill Sans", "Gills Sans MT", sans-serif; color:#333; background:#fffbff; }
label { display: block; margin: 5px 0 0; color:#666; }
form {
background: #ececec; width: 500px; margin: 25px auto; padding: 25px;
-moz-border-radius:.5em .5em 0 0; -webkit-border-radius:.5em .5em 0 0; border-radius:.5em .5em 0 0;
-moz-box-shadow: 0 0 8px #888; -webkit-box-shadow: 0 0 8px #888; box-shadow: 0 0 8px #888;
}
p.buttons { text-align:right; }
button { padding: 5px 10px; }
fieldset { padding: 0 15px; }
fieldset p { display:inline-table; }
</style>
</head>
<body>
<form type="POST" action="">
<h1>Dah Payrolla</h1>
<p>
<label for="">First name</label>
<input type="text" name="txtFirstName" id="txtFirstName" value="" />
</p>
<p>
<label for="">Last name</label>
<input type="text" name="txtLastName" id="txtLastName" value="" />
</p>
<p>
<label for="">Pay rate</label>
<input type="text" name="txtPayRate" id="txtPayRate" value="" />
</p>
<fieldset>
<legend>Time card</legend>
<p>
<label for="">Monday</label>
<input type="text" name="txtMonday" id="txtMonday" value="" />
</p>
<p>
<label for="">Tuesday</label>
<input type="text" name="txtTuesday" id="txtTuesday" value="" />
</p>
<p>
<label for="">Wednesday</label>
<input type="text" name="txtWednesday" id="txtWednesday" value="" />
</p>
<p>
<label for="">Thursday</label>
<input type="text" name="txtThursday" id="txtThursday" value="" />
</p>
<p>
<label for="">Friday</label>
<input type="text" name="txtFriday" id="txtFriday" value="" />
</p>
</fieldset>
<p class="buttons">
<button type="reset" name="btnReset" id="btnReset">Reset</button>
<button type="submit" name="btnSave" id="btnSave">Save</button>
</p>
<p><a href="output.php">View the Timesheets! →</a></p>
</form>
</body>
</html>
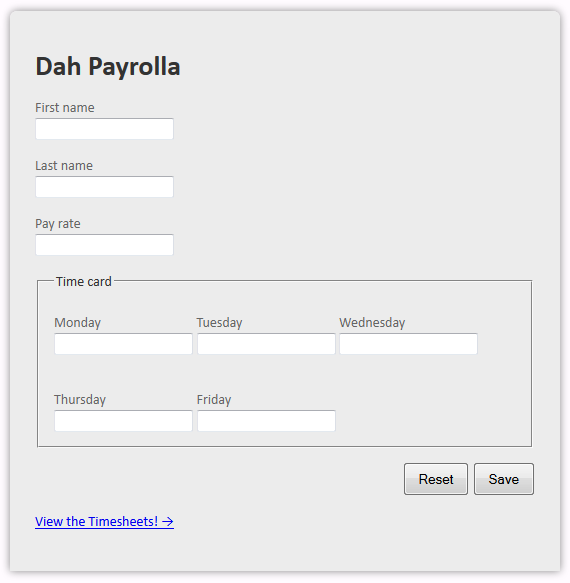
The core of this page is the form itself. The rest of the page is just there to make the form look a little nicer:
To actually DO anything with the page, we need to add a PHP section to the top and configure some code to handle each submission of the form:
<?php
    # URI: input.php
    # Used to insert employee timesheets into the table

    include( 'db.php' );

    if( isset( $_POST['btnSave'] ) ) {
        # form was submitted. Gather the values and insert if all is well

        $first = isset( $_POST['txtFirstName'] ) ? $_POST['txtFirstName'] : false;
        $last = isset( $_POST['txtLastName'] ) ? $_POST['txtLastName'] : false;
        $rate = isset( $_POST['txtPayRate'] ) ? $_POST['txtPayRate'] : false;
        $days = array(
            'monday'    => isset( $_POST['txtMonday'] ) ? $_POST['txtMonday'] : 0,
            'tuesday'   => isset( $_POST['txtTuesday'] ) ? $_POST['txtTuesday'] : 0,
            'wednesday' => isset( $_POST['txtWednesday'] ) ? $_POST['txtWednesday'] : 0,
            'thursday'  => isset( $_POST['txtThursday'] ) ? $_POST['txtThursday'] : 0,
            'friday'    => isset( $_POST['txtFriday'] ) ? $_POST['txtFriday'] : 0,
        );

        # The required values are correct
        if( $first && $last && $rate ) {
            # Build a database INSERT query string
            $str = "INSERT INTO employees ( first, last, rate, monday, tuesday, wednesday, thursday, friday ) VALUES (";
            $str .= "?, ?, ?, ?, ?, ?, ?, ? );";
            $times = array();
            foreach( $days as $key => $value ) {
                $times[] = $value;
            }

            $query = mysqli_prepare( $dbc, $str ) or die( "<h1>INSERT query failed!</h1>\n<p>Error: " . mysqli_error( $dbc ) . "</p>" );
            if(mysqli_stmt_bind_param( $query, "ssdddddd", $first, $last,$rate, $times )) {
                mysqli_stmt_execute($query);
                if( mysqli_stmt_affected_rows( $query ) == 1 ) {
                    # INSERT worked
                    header( "Location input.php" );
                    exit();
                }
            }
        }
    }
?>
So what does this snippet do? First, we include our database file, db.php. This makes all the code in that file available to this page. Second, we have a conditional that checks to see if the form has been submitted. If the form has been submitted, we go on to step three. I used what is called the tenary conditional. For each control, I check to see if the $_POST array contains an index for that control. This merely tells me that the form was submitted properly. In future tutorials we will cover how to make sure a value was entered by the user. If the $_POST array does not contain the control I’m looking for, I assign a default value to the PHP variable I would otherwise use to hold the value of the $_POST array item. The second part of validation, where you see me declare an array, is really just to establish a pattern for the second page. By using an array for the days, we logically group them as a unit. Arrays also have a lot of useful functions in PHP, which you will see in Part 2.
Once we’ve gathered our values, we check to see if the required variables have valid values. Since I assigned false to any variable that was not found in the $_POST array, using its value in the conditional will make the condition fail if any of them were not set correctly. We don’t want to insert garbage into our table, so this is a check we should always make. In real life you would sanitize these variables to remove any chance of malicious code being inserted, but for this example I leave that out.
If the conditional passes, we then build a query string. I always uppercase SQL keywords, since it helps me see what is a keyword and what is a field or table name (or alias) in the query string. I’ll let you figure out what the next couple of lines are doing, but in a nutshell, I assembling a string from the values of the PHP variables.
Once the string has been assembled, we use the PHP MySQLi library to prepare the query, using mysqli_stmt_prepare. The line that follows binds the values we want to insert to the placeholders in the SQL string (the ‘?’ characters) using the mysqli_stmt_bind_param function. The second parameter lets the MySQLi library know what the datatypes of the variables are, which is used to properly escape the parameters. An ‘s’ means the parameter is a string, whereas the ‘d’ means that the value is (or should be) a double-precision floating point number (or something that can be implicitly cast to one). We then execute the query, using the function mysqli_stmt_execute, which wants (in order) the connection to use and the query to execute. The variable $dbc was defined in our db.php file, and contains the information that mysqli_stmt_execute needs to connect with the database and execute the query. If the function completes without generating an error, we check to see if a new row was actually inserted, using the method mysqli_stmt_affected_rows. If the query executed correctly, the insert query should have inserted one and only one record. A value of 1 returned by mysqli_stmt_affected_rows indicates that the query worked. We then use another PHP method, header, to redirect the page to itself. This has the effect of completely resetting the form, which is what we want.
That’s it for Part 1. Part 2 will cover building the report from the data we insert on this page. If you want to verify your data is in the table before then, log into phpMyAdmin and look at your table.

